Found this in my personal email. I used to work somewhere that had a port-based firewall (Checkpoint Firewall 1), but, with no restrictions on what you could install locally.
I wanted to use IRC to chat with my ‘net buddies.
So, what did I do?
Installed a HTTP tunnel at home, hid it behind a website and used a SOCKS proxy on my work to encrypt & tunnel traffic to it on 80/tcp so that the firewall wouldn’t block it!!
Here’s that document, converted to HTML:
Disclaimer:
Don’t do this. Tech has moved on since 2004. At best, it won’t work. At worst, you’ll get into serious trouble for trying to evade corporate security measures.
This is posted purely for archive/educational purposes.
No warranty given, or implied.
Besides, we have ‘smart’ phones now with data connections and chatting/keeping in touch with friends without using the corporate connection is much easier.
Running a SOCKS proxy from home, and tunnelling to/from it via HTTP
Why?
Because, corporate firewalls generally block cool stuff like MSN Messenger/IRC/ICQ
Disclaimer:
Generally, companies don’t like you installing stuff on your work PC. They especially don’t seem to like you finding ways round their corporate Big Brother facilities like firewalls and content monitors. You have been warned.
Things you will need:
1. Work PC (this is where you are trying to run blocked stuff) with internet access.
2. Home PC (you’ll need to run server software at home).
3. Always-on broadband (needed to connect the two).
4. Fixed IP from your ISP, or a dynamic IP from the likes of www.dyndns.org – if you go with dynamic DNS, then you’ll need a dynamic DNS client such as http://www.directupdate.net/
5. HTTPort (http://www.htthost.com/) – this installs on the work PC.
6. HTTHost (http://www.htthost.com/) – this installs on the home PC.
Decide which port you are going to setup your HTTP tunnel on. This needs to be a port that already goes through the work firewall without being blocked. Port 80 (used by websites) and 443 (used by secure websites) are a good choice.
I’ll use port 443 in my example, as that’s what I use.
Download HTTHost. Unzip the file to a location. It doesn’t have an install. I just unzipped it to C:\Program Files\HTTHost\
Run ‘htthost.exe’ from within this directory.
Click the ‘options’ tab, and you’ll see:-
If you have more than one network card/address, then you must enter the address of the one you want to use in the ‘Bind listening to’ field.
‘Port’ (443 in the example above) is the port you want to setup the tunnel on. This needs to be a port that gets through your work firewall ok.
If you will only ever be accessing it from one location, then place the IP of this location into ‘Allow access from’.
Enter a password into ‘Personal password’ – you will need to use the same password in HTTPort which you will later install on your work PC.
It’s possible that the work firewall/security people will see all the traffic between your work PC, and your home PC (they won’t necessarily know it’s your home PC). So, you may wish to throw them off the scent by using the ‘Passthrough unrecognised requests to’ section.
In the example above, I receive requests on port 443 (secure HTTP), and pass anything unrecognised to port 80 (http). I use 127.0.0.1 because this is the standard address that means ‘this machine currently in use’. My home PC runs an Apache web server, so this means that anyone who tries to view my tunnel, gets a web page instead!! Try it for yourself: http://bazza.dyndns.org:443/ (this is the same port as used by my tunnel).
Now, to setup HTTPort on the work PC, and complete the tunnel.
Install HTTPort.
Run it from the ‘Start->Programs’ menu. You’ll see the following:-
I’ve already filled in most of the information needed.
‘Host name or IP address’ is the name/address of your work firewall. You should be able to get this (along with Port) from your Internet Explorer settings.
Generally, firewalls require username/passwords to access them. In my example, I’ve used ‘[redacted]’ – this is because we have a windows network. ‘[redacted]’ is the domain I logon to, and ‘[redacted]’ is my username.
Password, is generally your network password.
Misc options.
Leave ‘user-agent’ as ‘IE 6.0’ but, change ‘Bypass mode’ to ‘Remote host’ ‘Use personal remote host at’ If you leave this blank, it will attempt to connect to a public proxy. They are very slow, and not everything will work via them. In the example above, my tunnel is connecting to my home pc (listed as [redacted].dyndns.org), if you have a fixed IP then place it here. If you don’t, then you will need to sign up with a dynamic DNS provider such as www.dyndns.org (I’ll come back to this).
The ‘port’ must be the same as that used to setup HTTHost, and must be one that can get through the firewall.
The ‘password’ must be the same as used to setup HTTHost.
Don’t click on ‘Start’ just yet!
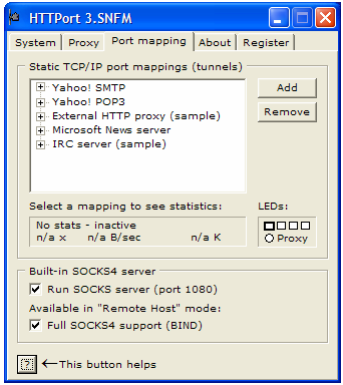
Click on the ‘Port mapping’ tab. You’ll see the following:-
Make sure that both check boxes at the bottom are checked.
Expand ‘IRC Server’, so that it looks like this:-
To change the ‘remote host’ , right-click on it, and select ‘edit’.
Type in ‘uk.quakenet.org’ as the address (without the quotes). This is the IRC server that you connect to #[redacted] on.
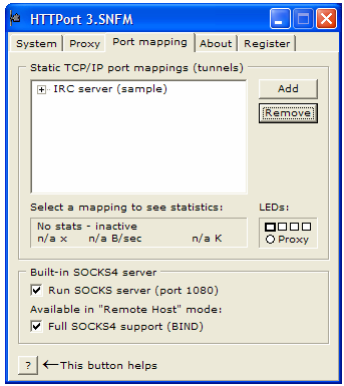
You can delete the other port mappings, so that it looks like this:-
Assuming that you’ve entered all the right data, and have the HTTHost running at home, you can click on the ‘Proxy’ tab, and click the ‘Start’ button. Click back to ‘Port mapping’ and you should see the little ‘lights’ light up when the tunnel is in use.
Now, to run IRC.
Rather than install/run a full IRC implementation, it’s easier to run a java applet from within a web page stored on your PC (or even on one of those little USB pen drives). This means that if someone hunts around your work PC, they may find the HTTPort, but, they won’t necessarily find the IRC application.
I use http://www.pjirc.com/ and have created my own HTML page specifically for connecting to #[redacted] using my username.
See attached file pjirc_2_0_4_bin.zip, unzip it to somewhere on your work PC, and open up OAP.html in a text editor. You’ll see the following:-
[HTML code for java IRC app redacted]
The bits in red are specific to me. Change yours to match your requirements, and save the file. Then double-click the OAP.html file on your work PC to run the IRC software.
It should automatically connect to your HTTPort on your work PC, which connects to your home PC, which then connects to QuakeNet, and then eventually you’ll see the chat room appear!
Give it some time.
It isn’t fast!! Look for the flashing lights on HTTPort. Red is bad. Green is good.
Click on the ‘system’ tab (in HTTPort) for clues as to what may be going wrong, if it doesn’t work.